# 教你如何穿衣服,lektor-theme-nix設定
在使用這個主題的時候,先看看README裡面寫了什麼,在使用前先讀取README是個好習慣!要完全使用這個主題的所有功能,需要完成5個步驟,以下接續說明:
- 404頁面
- 主頁
- 回應(評論)功能
- 專案檔設定
- 個人頭像
以下設定都是在原本的專案資料夾中,非主題裡面的資料夾,切記切記!
# 404主頁
須在content資料夾中建立404.html資料夾,並在資料夾中建立contents.lr檔案,設定檔案不使用任何model,並指向404.html。404.html/contents.lr內容如下:
_model: none
---
_template: 404.html
要這樣設定的原因有2個,第1個原因是lektor預設的model為page.ini,如果沒有設定任何model,那就會指向page.ini,並使用page.html來顯示網頁,所以需要設定_model: none才不會變成讀取page.ini及page.html;第2個原因則是404頁面的網址預設為http://127.0.0.1/404.html,與之前看到的網址http://127.0.0.1/about不一樣,為了使404網頁有效存取到指定的頁面,才需要在資料夾中包含副檔名。
# 主頁
主頁的設定跟404很像,首先在content根目錄下建立contents.lr(預設應該已經有了),不使用任何model並指向index.html,因此content/contents.lr內容如下,原本檔案中如果有資料,全部刪除,留著的話Lektor也讀不到喔:
_model: none
---
_template: index.html
# 回應(評論)功能
這個功能可以在網頁中加入DISQUS的外掛,讓遊客直接在網頁下方留言,在部落格或是新聞網頁常常看得到。
首先需使用指令安裝:
$ lektor plugins add lektor-disqus-comments
接下來在專案中新增config資料夾,並在資料夾中建立disqus-comments.ini,檔案中設定shortname,值可以自訂,我這邊設定他為30-lektor-test:
shortname = 30-lektor-test
另外必須在.lektorproject檔案中完成comments = yes設定,才會啟動回應功能喔!可參考下面設定結果的內容~
# 專案檔設定
README中還有提供可以在.lektorproject檔案裡面設定的參數,以下資訊有的就放,沒有就刪除。但是name、headerusername、headerhostname、comments需要留著,不然頁面會出錯:
[theme_settings]
githubID = your_github
gitlabId = your_gitlab
twitterID = your_twitter
codepenID = your_codepen
linkedInID = your_linkedin
googleplusID = your_googleplus
facebookID = your_facebook
instagramID = your_instagram
telegramID = your_telegram
name = your_name
headerusername = username
headerhostname = hostname
email = your_email
about = info_about_you
profilepicture = profile_picture_asset_url
googleanalytics = your_google_analytics_id
slackURL = https://join.slack.com/...
comments = yes
# 個人頭像
在assets資料夾中加入個人頭像的照片,並在.lektorproject中的profilepicture設定照片路徑。我在assets/img中加入個人頭像照片,並命名照片名稱為profile.png,因此.lektorproject的profilepicture = img/profile.png。可參考下面設定結果的內容~
# 設定結果
以下是我設定的.lektorproject內容:
[project]
name = LektorTest_Theme
themes = lektor-theme-nix

[theme_settings]
githubID = HanInfinity
name = 塔塔默
headerusername = Tatamo
headerhostname = Tatamo_host
about = Tatamo
comments = yes
gitlabId = tatamo
profilepicture = img/profile.png

[packages]
lektor-disqus-comments = 0.4.1
完成後的首頁就會變成這樣囉!!
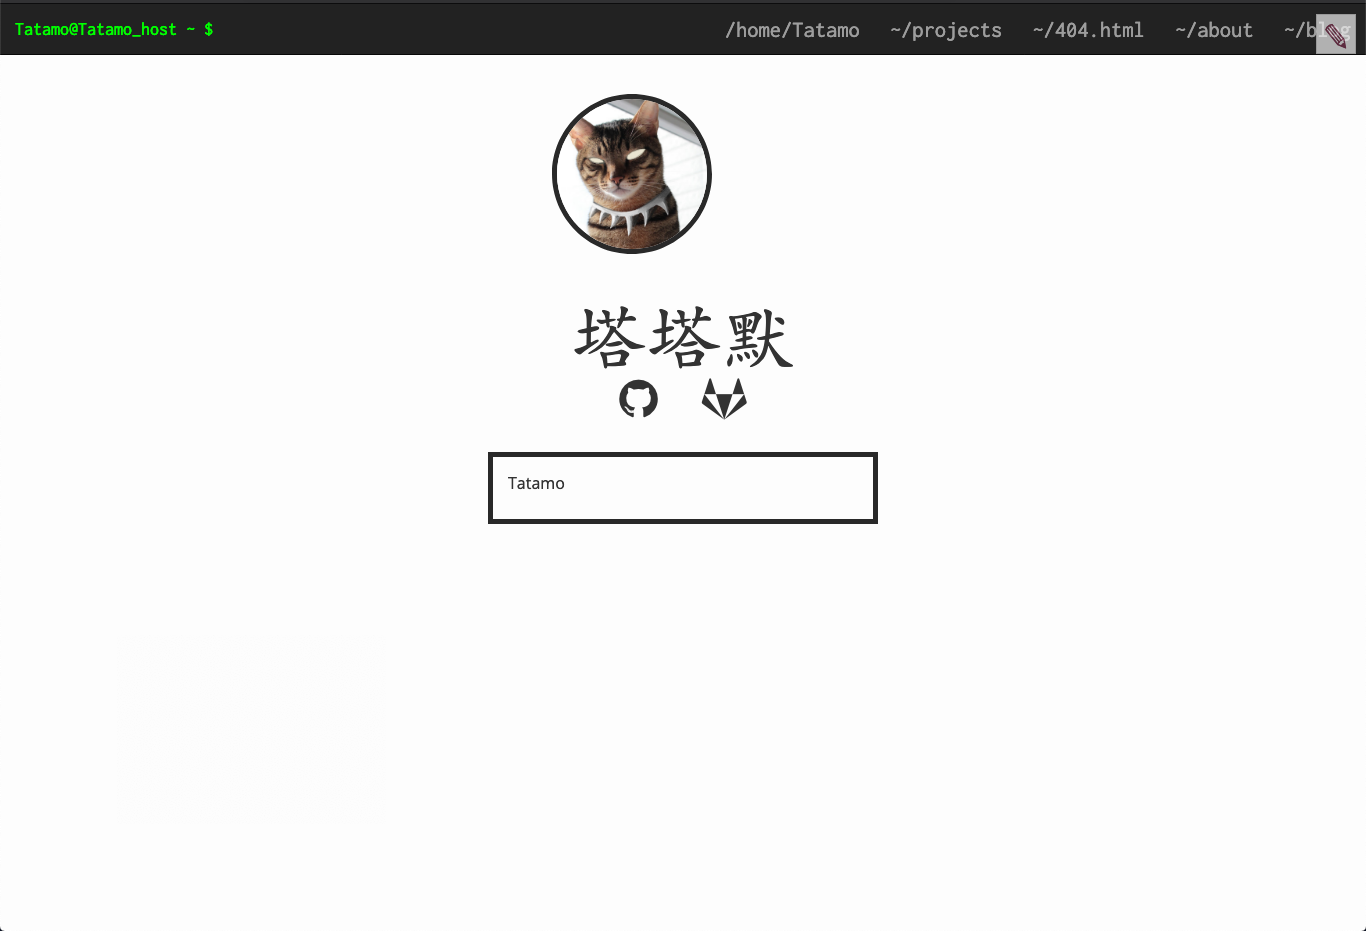
設定完才知道,原來左上角的@ ~ $是要做成類似終端機的格式,用headerusername@headerhostname - $模仿命令列的符號。實際的運作邏輯我們下一篇來探討吧!!
# 團隊系列文
CSScoke - 金魚都能懂的這個網頁畫面怎麼切 - 金魚都能懂了你還怕學不會嗎 King Tzeng - IoT沒那麼難!新手用JavaScript入門做自己的玩具~ Hina Hina - 陣列大亂鬥 阿斬 - Python 程式交易 30 天新手入門 Clarence - LINE bot 好好玩 30 天玩轉 LINE API 塔塔默 - 用Python開發的網頁不能放到Github上?Lektor說可以!! Vita Ora - 好 Js 不學嗎 !? JavaScript 入門中的入門。